以下為Arduino Uno板的LED_BarGraph實驗
需要材料:
Wire: n個
330Ω Resistor: 六個
LED: 六個
Arduino Uno: 一個
Breadboard: 一個
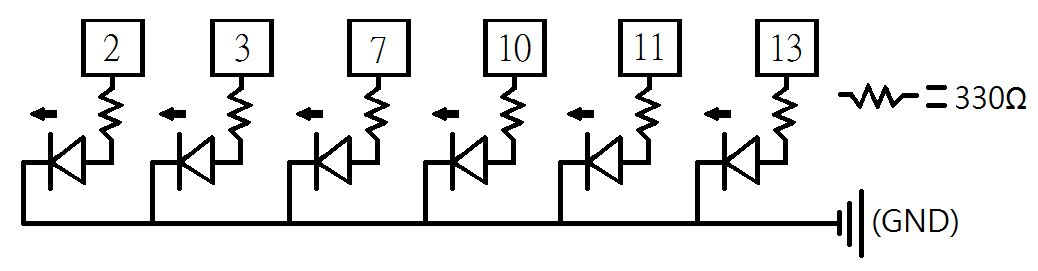
電路圖(Circuit diagram)
程式碼(Code)
const int ledCount = 6; //有沒有在前面加const都沒差
int ledPins[] = { //腳位能重複輸入
2, 3, 7, 10, 11, 13};

void setup() {
  //Serial.begin(9600);
  for (int thisLed = 0; thisLed < ledCount; thisLed++) { //不能等於10因為0也算一個數
    pinMode(ledPins[thisLed],OUTPUT);
  }
}

void loop() {
  for (int thisLed = 0; thisLed < ledCount; thisLed++) {
    int ledSerial = analogRead(thisLed); //analog用於(類比訊號)
    //digital用於(數位訊號) Read(讀取這值)
    //Serial.println(ledSerial); //要查看thisLed的值,
    //就要丟到for裡才行,因為thisLed只會在for裡執行
    digitalWrite(ledPins[thisLed], HIGH);
    delay(300);
    digitalWrite(ledPins[thisLed], LOW);
  }
  for (int thisLed = ledCount-1; thisLed >= 0; thisLed--) {
    int ledSerial = analogRead(thisLed);
    Serial.println(ledSerial);
    digitalWrite(ledPins[thisLed], HIGH);
    delay(300);
      if (thisLed == 0) { //在for內使用if
    delay(1000);
  }
    else {
      digitalWrite(ledPins[thisLed], LOW);
    }
  }
}
參考網站:
Lab5 LED_Bar_Graph:
http://coopermaa2nd.blogspot.tw/2010/12/arduino-lab5-led-bar-graph.html
參考對象: